
Lavender & Tangerine Sunset Soap Bars
Make these gorgeous Lavender & Tangerine Sunset Soap Bars by following this super-easy melt & pour soap tutorial.
Servings: 6 bars
Equipment
- Small Glass Beaker (25-100ml)
- An Angled Ramp (Book + Cutting Board)
- Alcohol in a Small Spray Bottle
- Kitchen Scales
- Glass Measuring Jug
- Bamboo or Metal Skewer
- Paper Towel
Ingredients
- 50 g Clear Melt & Pour Soap Base
- 190 g White Melt & Pour Soap Base
- 4 colors Soap Coloring Purple, Pink, Orange, Yellow
- 20 drops Lavender Essential Oil
- 40 drops Tangerine Essential Oil
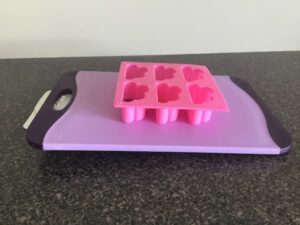
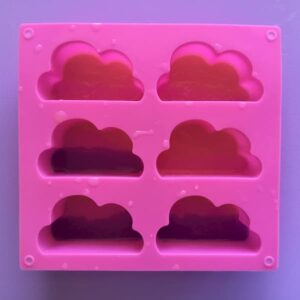
- 1 Cloud Silicone Mold
Instructions
- Assemble an angled ramp out of a cutting board and a book no more than 1” (2.5cm) in height.
- Use a set of kitchen scales to measure out 50g of clear melt & pour soap base. Cut up the soap base into small cubes for easy melting.
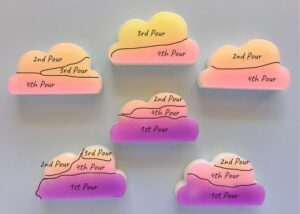
1st Pour
- Weigh out 10g of clear melt and pour soap base into a small glass beaker. Melt in the microwave in short bursts of 10 seconds, stirring well in between (watch it carefully, don’t let it boil!).
- Add 1 drop of purple soap coloring and stir well until combined and you have an even color. If your soap mixture has lots of bubbles in it, spray the surface with alcohol.
- Place the cloud mold on the angled ramp with the bottom of the cloud shapes angled down so that when soap is poured into the mold it will pool at the base of each cloud.
- Spray the base of three of the cloud cavities with alcohol, then very carefully pour a small amount of soap mixture into each of the three cavities (refer to the ‘1stPour’ on the Pour Diagram). Immediately spray the soap with alcohol, doing so will help your soap spread out to the edges of the cavity and remove any surface bubbles. Discard any remaining soap.
- Leave your 1st Pour to set for at least ten minutes. Clean and dry your small beaker to use for the next pour while you wait.
2nd Pour
- Weigh out 10g of clear melt and pour soap base into a small glass beaker. Melt in the microwave in short bursts of 10 seconds, stirring well in between (watch it carefully, don’t let it boil!).
- Add1 drop of orange soap coloring and stir well until combined and you have an even color. If your soap mixture has lots of bubbles in it, spray the surface with alcohol.
- Ensure your 1st pour has set, then turn the cloud mould around so the top of the cloud shapes are angled down so that when soap is poured into the mold it will pool at the top of each cloud.
- Spray the base of each of the cloud cavities with alcohol, then very carefully pour a small amount of soap mixture into each applicable cavity (refer to the ‘2ndPour’ on the Pour Diagram).Immediately spray the soap with alcohol, doing so will help your soap spread out to the edges of the cavity and remove any surface bubbles. Discard any remaining soap.
- Leave your 2nd Pour to set for at least ten minutes. Clean and dry your small beaker to use for the next pour while you wait.
3rd Pour
- Weigh out 10g of clear melt and pour soap base into a small glass beaker. Melt in the microwave in short bursts of 10 seconds, stirring well in between (watch it carefully, don’t let it boil!).
- Add 1 drop of yellow soap coloring and stir well until combined and you have an even color. If your soap mixture has lots of bubbles in it, spray the surface with alcohol.
- Leave your soap mould on the ramp in the exact same position you used for the 2nd Pour.
- If the alcohol has dried, respray the base of each of the cloud cavities with alcohol, then very carefully pour a small amount of soap mixture into each applicable cavity (refer to the ‘3rd Pour’ on the Pour Diagram).Immediately spray the soap with alcohol, doing so will help your soap spread out to the edges of the cavity and remove any surface bubbles. Discard any remaining soap.
- Leave your 3rd Pour to set for at least ten minutes. Clean and dry your small beaker to use for the next pour while you wait.
4th Pour
- Add the remaining (~20g) clear melt and pour soap base into a small glass beaker. Melt in the microwave in short bursts of 10 seconds, stirring well in between (watch it carefully, don’t let it boil!).
- Add 1-2 drops of pink soap coloring and stir well until combined and you have an even color. If your soap mixture has lots of bubbles in it, spray the surface with alcohol.
- Ensure the previous 3 pours have set and then remove the book from the ramp so the cloud mold on the cutting board is sitting on a flat surface.
- Spray the base of each of the cloud cavities with alcohol, then very carefully pour the soap mixture into each cavity, filling in any remaining gaps between the colors that have already been poured. Pour enough soap in so the pink overlaps part way with the other colours and doesn’t just butt up against them. This will give you a prettier ombre effect. Spray the soap with alcohol to remove any surface bubbles. Discard any remaining soap.
- Set your ombre layer of soap aside to set for at least anhour.
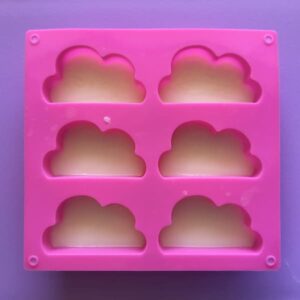
Final (5th) Pour
- Ensure your ombre layer of soap has set. Remove any stray drops of colored soap from the edges of your cloud mold cavities.
- Measure out 190g of white melt & pour soap base. Cut up your soap into small cubes and put it in a 16oz/500ml glass jug.Melt in the microwave in short bursts of 30 seconds, stirring well in between (watch it carefully, don’t let it boil!).
- Add the Lavender and Tangerine essential oils and stir well until combined. If your soap mixture has lots of bubbles in it, spray the surface with alcohol.
- Put the cutting board (with the mold on top) onto a set of kitchen scales and spray the ombre layer of each cavity liberally with alcohol (this will help the ombre and white layers stick together).
- Tare your kitchen scales and then carefully pour out 30g of soap down the edge of each cavity into the mold (refer to ‘The Final Pour’ under ‘Important Recipe Notes’ in the main blog text). Repeat until 30g of soap has been poured into each cavity (it doesn’t matter if you accidentally go a couple of grams over, that’s what the wastage is for). Spray the surface of the soap with alcohol to remove any bubbles.
- Set your soap aside to set overnight.
Demolding the Soap
- When your soap has set, pop each sunset soap bar out of the silicone mold.