Essential Oil Diffuser Christmas Tree Ornaments
These beautiful essential oil diffuser Christmas Tree Ornaments will make your fake tree smell like the real thing!
Ingredients
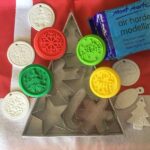
- 1 Packet Air-Hardening Clay
- Rolling Pin
- Christmas-Themed Cookie Stamps
- Christmas-Themed Cookie Cutters
- A Drinking Straw
- Ribbon, String or Twine
- 10-20 Drops Essential Oils
Instructions
- Prepare a non-porous surface on which to roll out your air-hardening clay. I like to use glass or plastic cutting boards.
- Roll your clay out to about 4mm or 3/16” thick. Imprint an image on your clay with a rubber or cookie stamp. If necessary, wet both the clay and the cookie stamp with a finger dipped in water to stop them sticking to each other. If your stamp leaves any unwanted wrinkles or tears in your clay then, again, a finger dipped in water can be used to smooth the surface of the clay.
- Now position your cookie cutter in the desired location over your stamped image and cut out your ornament.
- Smooth any frayed edges with a finger dipped in water or a pair of scissors.
- Finally, take your drinking straw and poke a hole at the top of your ornament (for ribbon or string to be threaded through).
- Put your ornaments aside to dry (refer to the instructions on your packet of clay to determine a suitable time frame for drying).
- Soak your ornaments in 10-20 drops of essential oil in a covered bowl (not plastic) until all of the essential oil has been absorbed (if they are a gift, do this as close to the time of gifting as possible).
- Hang them on your Christmas tree or place them in a small organza bag and gift to a teacher, friend or relative.
Notes
Wet clay can be grey in color, but it will whiten as it dries.