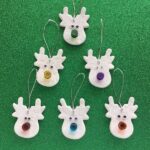
Reindeer Family Essential Oil Diffuser Ornaments
Make gorgeous essential oil diffuser ornaments of Rudolph and his whole family!
Servings: 8 Ornaments
Equipment
- Rolling Pin
- Craft Glue
- Cutting Board or Vinyl Tablecloth
Ingredients
- 1 Pack White Air Hardening Clay
- 1 Each Christmas-Themed Embossed Rolling Pin
- 1 Each Reindeer Head Cookie Cutter
- 8 Each 1ml or 1/4 dram glass sample vials
- 1 Roll Ribbon, Twine or String
- 8 Pairs Googly Eyes
- 20 Drops Essential Oils
Instructions
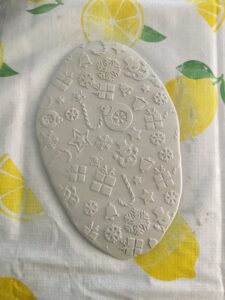
- Prepare a non-porous surface on which to roll out your air hardening clay. I like to use glass or plastic cutting boards, or a vinyl tablecloth.
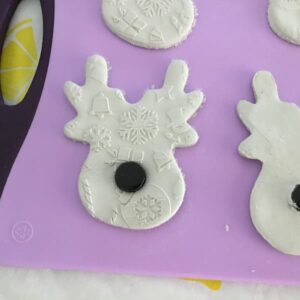
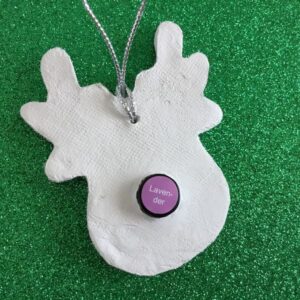
- Roll your clay out to about 5mm or 3/16” thick with a standard rolling pin. While applying a deep and even pressure, roll your Christmas-themed embossing rolling pin over your clay to create a patterned texture on the surface of the clay.
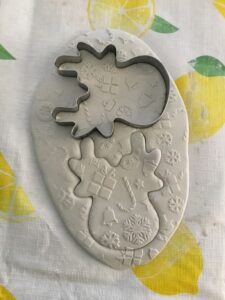
- Now position the reindeer head cookie cutter in the desired location over your embossed clay and cut out as many ornaments as will fit. Peel away the surrounding clay and move your ornaments to the side so you can roll the remaining clay out again to make more ornaments.
- Once you have the desired number or ornaments, smooth any frayed edges with a finger dipped in water or snip them off with a pair of scissors (scissors can also be used after the clay has dried to snip off frayed edges).
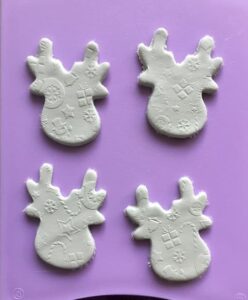
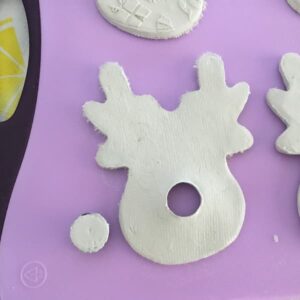
- Place your ornaments on a clean surface. Remove a cap from a glass sample vial and position it in the middle of the reindeer ornament’s face, right about where you think the nose should be. Push the cap into the clay in order to cut out a cap-shaped hole in the clay. Peel away and discard the small circle of clay that was cut out by the cap. Put this cap aside as you will use it to cut out the nose shapes of all of your ornaments.
- Grab another sample vial cap and put it top-side-up on your working surface. Carefully flip the clay ornament over and place the nose hole over the sample vial cap. The cap will be sticking up through the nose of the face-down reindeer ornament.
- Use a toothpick like a small rolling pin to carefully flatten the clay tightly around the cap. The clay needs to dry face down with the cap in place. As the clay dries it will shrink and fit snug around the sample vial cap. If you let the clay dry and then try to push the cap through later, it may not fit.
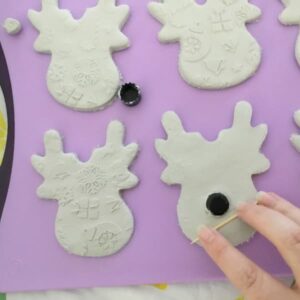
- Continue to punch nose holes and position your clay ornaments over the sample vial caps until they are all complete. When you get to the last ornament, wipe down clean the cap you were using to punch the nose holes before embedding it in the clay ornament.
- Finally, take a toothpick and poke a hole through the top of your ornaments (for ribbon or string to be threaded through).
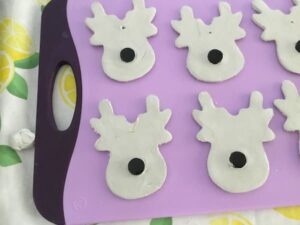
- Put your ornaments aside to dry face down. After 24 hours or so, when they are mostly dry and very stiff, you can flip them over to dry on the other side. Refer to the instructions on your packet of clay to determine a suitable time frame for drying.

- Once dry, thread your twine, ribbon or string through the hole and tie it off. Screw the sample vial back onto the cap and this will make the nose of your reindeer. Use craft glue to stick on some googly eyes to complete your reindeer’s face.
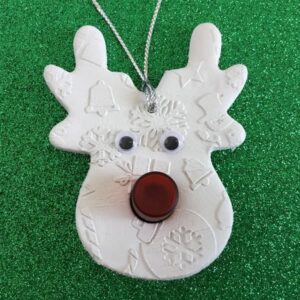
- Fill your sample vial with essential oils (approximately 20 drops) and add the dripper lid.
Directions for Use
- To use, apply the essential oils to the back of the ornament (depending on which oils you use there may be coloring or staining, so best to apply to the back). When the scent fades, simply unscrew the reindeer’s nose and reapply the essential oils.Hang them on your Christmas tree or place them in a small organza bag and gift to a teacher, friend or relative.
Notes
Wet clay can be grey in color, but it will whiten as it dries.