
So now summer is here I’m looking for activities to keep my kids occupied and was inspired again by this Emoji-themed ice cube mould. 😍
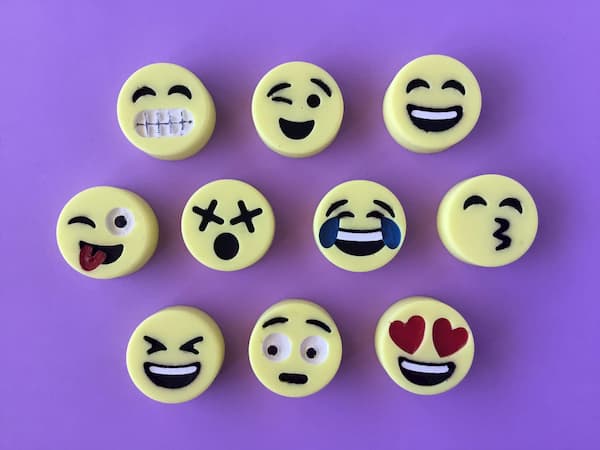
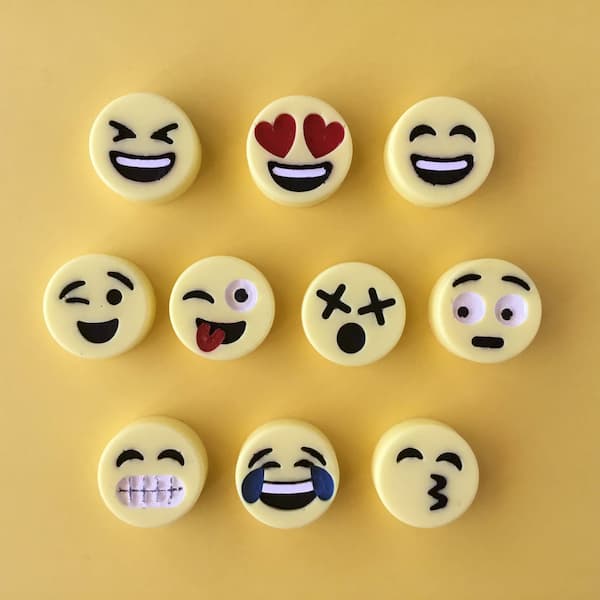
The soap came out a treat, but I thought I’d give the kids an extra fun activity by letting them paint the facial features on the soap to really make the emoji’s POP OUT! 😳😂😚😵
This post contains affiliate links. If you buy something through one of those links, I will receive a small commission at no extra cost to you. As an Amazon Associate I earn from qualifying purchases.
Thank you for supporting my site!
Painting Soap
Using paint to bring out the details of your design is actually quite common in the DIY soap making world. Some people like to create all sorts of soap/dye/mica/glycerin concoctions, but these can be quite complicated (let’s save that blog post for another time). As this project is to keep the kids occupied during the summer break, let’s go with the cheat’s version.
All you need is some water-based acrylic craft paint.
Painting soap with craft paint can also be tricky at times (getting it to stick etc) but our emoji soaps have the added benefit of all of their details being embedded in the surface so you don’t have to worry about it accidentally rubbing of with regular contact.
Hints and Tips
- You will need the smallest, finest paint brushes you can find for painting the emoji’s facial features. A toothpick dipped in paint can also be used.
- If your paint is thick or gluggy, water it down to a smooth consistency. Coat the tip of your paintbrush with paint and then ‘blob’ it gently into the crevasses of the emoji’s facial features and then use the brush to gently push the paint into all corners and tight spots.
- If you end up with paint somewhere you don’t want it, simply wait for it to dry and then scrape it off with a toothpick or fingernail.
- Be prepared to do more than one coat of paint. With the first coat, just concentrate on getting the paint on the soap, regardless of whether you can see the underlying colour coming through. Your second coat will be much easier as the paint will stick well to the first coat.
Gather Your Supplies
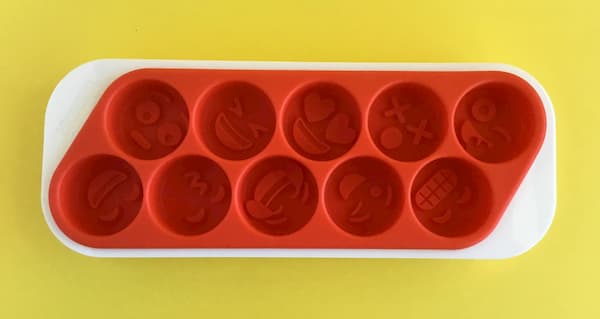
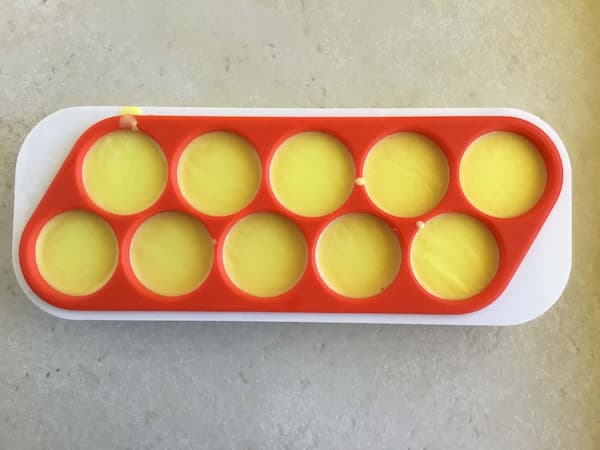
We used this emoji-themed soap mould to make our soap. Each emoji is 1 5/8” (4.1cm) in diameter.
Choosing the colour was a no-brainer. Emojis are yellow so yellow soap it is. I found 10 drops of soap colouring made the perfect emoji yellow.
When making soap I always fill my moulds to just below the surface as I find this helps with a nice, clean outline. I measured my soaps as 20g each, so to make one of each of the ten emoji designs, you will need 200g of melt and pour soap. I also added 10% (another 20g) to account for wastage and accidently pouring 1 or 2g more of soap into the mould cavities (hey, nobody’s perfect 😉).
We chose a happy, fun scent for our soap. Bergamot, Patchouli and Geranium essential oils at a ratio of 3:3:1. The kids told me it smelled like candy – yum.
The melt and pour soap manufacturer recommended 10-40 drops of essential oil per 100g of soap, so we ended up with the following combination:
- 30drops Bergamot Essential Oil
- 30drops Patchouli Essential Oil
- 10drops Geranium Essential Oil
You will also need water-based acrylic paint in four colours:
Blue – for the tears of laughter
Red – for the tongue and heart-shaped eyes
White – for the teeth and whites of the eyes
Black – for the outline of facial features
You will need the smallest, finest paint brushes you can find for painting the emoji’s facial features. A toothpick dipped in paint can also be used. I also used a paint palette so I could easily add a couple of drops of water to mix with the paint if it needed watering down.
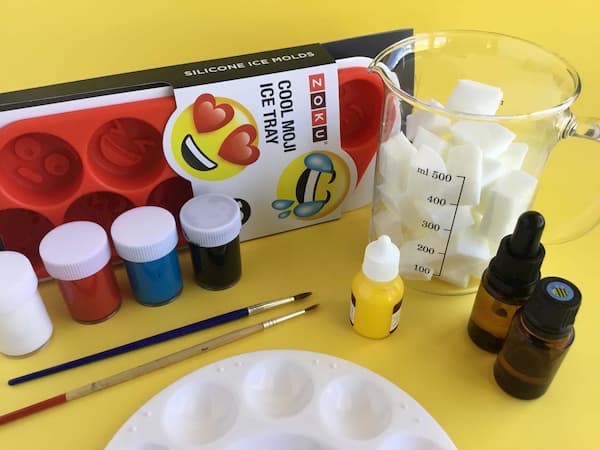
What you need
- 220g of soap (this includes 10% for wastage)
- 10 drops of yellow soap colouring
- 30drops Bergamot Essential Oil
- 30drops Patchouli Essential Oil
- 10drops Geranium Essential Oil
- Emoji Soap Mould
- Acrylic Paint
- Paint Brush
- Paint Palette
- Toothpicks
Additional Items Required
Rubbing Alcohol or Vodka in a Small Spray Bottle – Spraying your soap with alcohol will help remove any bubbles sitting on the surface.
Kitchen Scales – I’ve used grams in this recipe because the amounts are easier to manage compared with ounces. Most kitchen scales these days are interchangeable between grams and ounces. Check your scale’s instruction booklet for how to change you scale to measure in grams and then change it back when finished.
Glass Measuring Jug – I have a separate glass measuring jug dedicated to essential oil DIY (soap making, lotion bars, lip balm etc) to avoid any cross-contamination of non-ingestible ingredients with food. I recommend you do the same.
Metal or Bamboo Skewer – Skewers are super handy for stirring and can be easily cleaned or disposed of. Of course you can use a metal spoon for stirring, but as I mentioned with the measuring jug, I recommend you don’t use the spoon for food afterwards.
Paper Towel – Make sure you have some paper towel on hand for cleaning up (there may be drips) and for resting your skewers on after stirring. I also recommend placing your soaps onto paper towel when painting them.
Method
Measure out 220g of melt and pour soap (this includes 10% extra for wastage).
Cut up your soap into small cubes (for easy melting) and then place them in a glass measuring jug. Melt in the microwave in short bursts of 30 seconds, stirring well in between.
Repeat until your soap is melted (watch it carefully, don’t let it boil!).
Add the soap colouring and essential oils. Stir well until the essential oils are well combined and you have an even colour. If your soap mixture has lots of bubbles in it, spray the surface with alcohol and then gently stir again to get rid of the bubbles.
Position your soap mould on your kitchen scales with the mould cavities you wish to fill in the centre, and press tare to reset your scale to zero.
Pour your soap into one mould cavity until your scale reads 20g, then tare your scales and pour your soap into the next soap cavity until your scale reads 20g again. Continue until all 10 mould cavities are filled. Remember we have built in a 10% wastage factor so you don’t need to worry if you over-fill your mould cavities by 1 or 2 grams. Just try not to make a habit of it as the last moulds you fill may end up a little smaller than the rest.
If there are bubbles present on the surface of your soap, a couple of sprays of alcohol should remedy this.
Wipe any excess soap out of your glass measuring jug with a paper towel. Then soak your measuring jug in water for ten minutes before rinsing it out and wiping it dry with another paper towel. Now you can hand wash it or put it in the dishwasher as per normal.
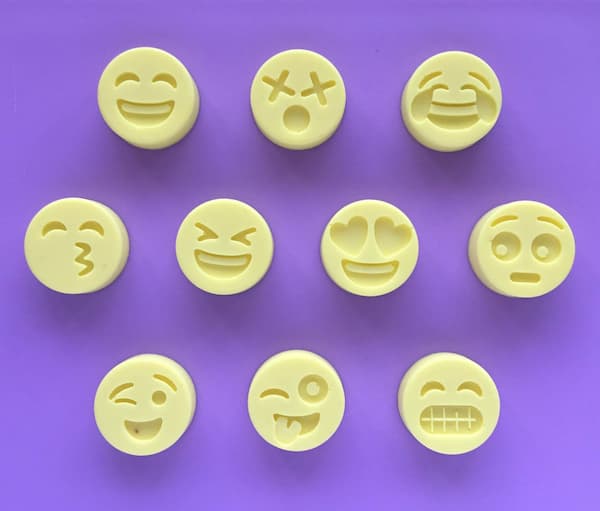
Set your soap aside to harden overnight.
To release your soap gently stretch the silicone to release the edges of your soap. Then turn your mould over and gently press on the emoji faces to release your soaps from the mould (I let the kids do this part – they loved it!!).
The Painting Part
Set your kids up with a paint palette with red, blue, white and black paint in it, plus a cup of water to wash out their brushes.
If your paint seems thick, water it down to help it spread into the crevasses of the facial features (the good news is that any mistakes or paint outside the lines can be easily scraped off the soap with a toothpick or fingernail once dry).
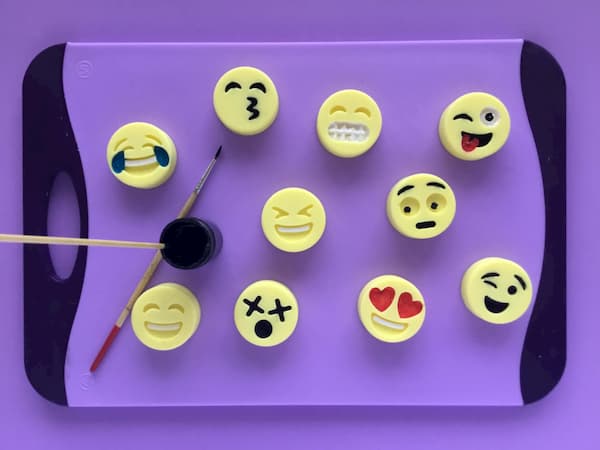
Once painted, set your soap aside to dry and if necessary apply a second coat of paint.
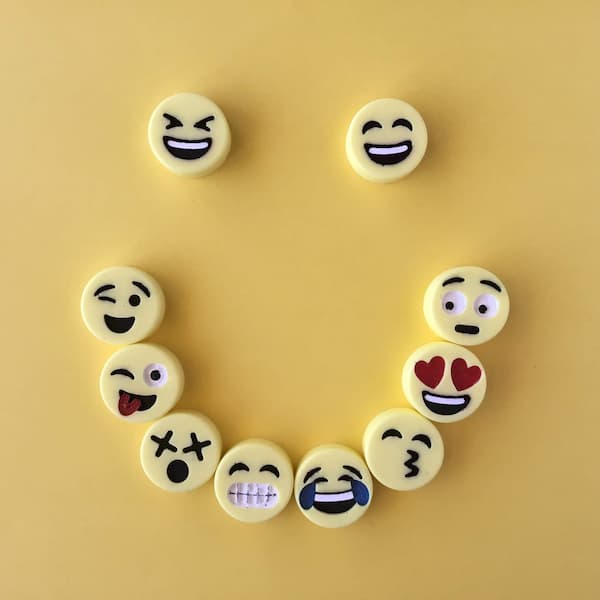
Your soap is now ready for use, or you can add a few to a cellophane bag tied up with a pretty ribbon to give as a gift.
Enjoy!
